Armchair made of metal rods. Metal rocking chair. Instructions for making a vanka-vstanka
Reading time ≈ 5 minutes
This article is step by step instructions By self-manufacturing metal rocking chairs, which also features photos and videos. Thanks to detailed explanations, you will not make a mistake with the choice of materials, and you may also gain new skills that will be useful in future projects.
Materials for making a rocking chair with your own hands
The first thing you need to do is to purchase metal parts for the future rocking chair. You may need to seek help from someone who will make for you exactly the shape of the frame that you need. If you work together with a professional, he will be able to give helpful advice, help with the choice of materials, etc.

Ideal for frame homemade chair- Rocking chairs made of metal will become a 20 mm (in diameter) steel rod. If you think the rod is too heavy for the frame, you can use steel pipes.

As a result, as you can see in the photo, you should get a set of rods of the following sizes (pay attention to the drawings):
- A: 4 x 650 mm
- B: 2 x 268mm
- C: 2 x 867mm
- D: 2 x 600 mm
- E: 2 x 896 mm

Of course, you can change the dimensions of a rocking chair made of metal, but be careful in the calculations.
Fitting metal rods


So that everyone steel element the future frame fit snugly against each other after welding, their ends need to be adjusted (to understand exactly how to do this, watch the video presented on the site). This will be easy to do if you have a desktop . As a result, you should get the following:
- Rods ‘A’ ground at both ends
- Rods ‘B’ ground on one side
- Rods ‘C’ ground on one side
- ‘D’ stems do not require grinding
- ‘E’ stems do not require grinding
Welds


Start by connecting the rods of the two sides of the rocking chair (B, C, D) as shown in the photo. Better to do it on the floor to ensure perfect smooth construction. If you have a magnetic welding square, use it. Otherwise, use a cinder block to achieve a 90º angle.

After welding the two sides (B, C, D), connect them with rods A.
Shaping


It takes a little imagination to figure out how to bend a 20mm diameter steel rod. Especially if you don't have any special tool like pipe bender. You will need a pipe and a tree with a forked trunk (as you can see from the photo, the trunks should be close to each other). Place the rod between the trunks and put the pipe on it. Holding on to the latter and applying pressure, you will gradually be able to give the rod the desired shape. Try to keep the 'E' parts as similar as possible.
Attach Curves 'E'


A sturdy do-it-yourself metal rocking chair frame is almost ready. Now you need to weld the ‘E’ parts, after the ‘D’ and ‘B’ parts (most likely, they will need to be adjusted quite a bit to fit the curved ‘E’). The hardest part of the journey is over!
Sling test on frame


If one of your loved ones has sewing skills, entrust the creation of a cover to one of them. You can use an old blanket or a durable blanket, from which you will need to cut a 600 mm strip. It should be sewn to the top two rods ‘A’ so that you get a kind of sling in which you will sit. Very simple and great!
Cleanup


If your welds turned out similar to those shown in the photo, you must admit that such a rocking chair will not have the best attractive appearance. Grinding the seams will take some time, but the result is worth it.
Painting

This is probably the most enjoyable part of the whole job. But first, thoroughly clean the frame of the chair with hot soapy water from dirt and grease. After rinse clean water and let dry completely.


Hang the frame wherever you like. It is better to paint on a warm, not too windy day. The first and second layer will be a primer (ground base). But the second is applied a few hours after the first. Next comes two layers of the main primer (third and fourth), which are applied 24 hours after the primer. It is better that the last two layers are gray. As a result, the appearance of the finished rocking chair will be much more spectacular. After that, apply a matte varnish.
Choice of sling color

What color your rocking chair will be is up to you. It is desirable that it be a durable material made of 100% cotton. By the way, if you already have a piece of light fabric, you can only purchase a special dye and, following the instructions, give it the desired shade.
Sling tailoring


In terms of dimensions, you will need a piece 1200mm wide and approximately 1300mm long. It will need to be folded in half, so that the result is a rectangle of 600x1300 mm. The two long sides of the rectangle are sewn together, and the resulting sleeve is turned inside out. Each end of the sleeve is also sewn with cut edges inward (as in the photo) in order to prevent the sling from wearing out soon.
Your own garden is a great place for both work and relaxation. For a complete country rest people have come up with a variety of devices from swings to hammocks. Armchairs are a classic piece of comfortable furniture. But someone ingenious managed to make an addition to its design that made it even more convenient: a rocking chair was born. This model allows you to perfectly relax all the muscles, and unhurried and rhythmic rocking is conducive to pleasant thoughts, soothes, lulls. The rocking chair has proved so popular that since its invention, many variations and modifications have appeared. Moreover, it turned out that a do-it-yourself rocking chair made from different materials is not a myth.
For creating classical model rocking chairs need willow vines. Openwork and lightweight construction looks great against the backdrop of summer greenery and blends well with the interior garden house or gazebos. The disadvantage of this light and durable product is one - the fear of excess moisture.
It is not so easy to make a light and seemingly unpretentious chair from a willow vine. You need to be able to prepare the material, and the weaving technique requires special skills.
Rattan is a flexible vine that grows in Southeast Asia. Wonderful and very beautiful chairs are also woven from rattan. In beauty, they are not inferior to willow, which cannot be said about strength. Neither screws nor nails are used to create rattan furniture. All connections are held only thanks to glue and skillful knitting.

Rattan as a raw material is not sold in our stores. Such a rocking chair for the owner of the cottage is a good buy, and not a product in the manufacture of which he can show his creative abilities
If we talk about the strength and durability of the product, then this model, created from forged metal. An elegant lace structure will decorate any garden.

The main advantage of this model is its durability. The main one, but not the only one. Agree that this thing looks like an elegant silver jewelry
Rocking chairs are used not only as country furniture. Distinctive feature office rocking chair are its respectability and solidity.

Office workers also appreciate high-quality rocking chairs as accessories that help to fully relax from the bustle of business. Of course, office models are different from the country version.
There are also designer models of rocking chairs made in high-tech style.

Very interesting and, most importantly, quite functional model. Combines a comfortable rocking chair and a spotlight
Some super modern rocking chair designs are truly unique. Like more simple models, they guarantee their owner comfort, but, in addition, independence from energy sources. Such a product, equipped with solar panels, allows you to spend time with comfort and benefit.

For the base of this design, you can use thick plywood, and for its upper part - polycarbonate. Find online solar panels Today is not a problem either.
Master class: rocking chair for two
A double rocking chair is more like a sofa. If you put a few pillows or throw a blanket on this comfortable structure, you simply cannot find anything better for a summer vacation. We will tell you how to make such a rocking chair with your own hands.

Who said that you can only enjoy the comfort of a rocking chair alone? This model is good for two
Stage # 1 - preparing tools
Making a quality rocking chair is not as difficult as it seems. Having all the necessary tools and stocking up quality materials, you can quickly do everything yourself. What kind of tools do we need for this work?
- Electric jigsaw complete with wood saws.
- Disc grinder. It will need nozzles with different grain sizes. Actually manual frezer may also be needed, but if you have a large amount of coarse sandpaper and if the grinder has sufficient power, you can do without it.
- Screwdriver with a set of drills for wood and bits.
- A right angle with a long ruler.
- Roulette.
- Hammer.
- Putty knife.
- Brushes and pencil.
Proper organization of work assumes that all of the listed tools will be literally at hand.
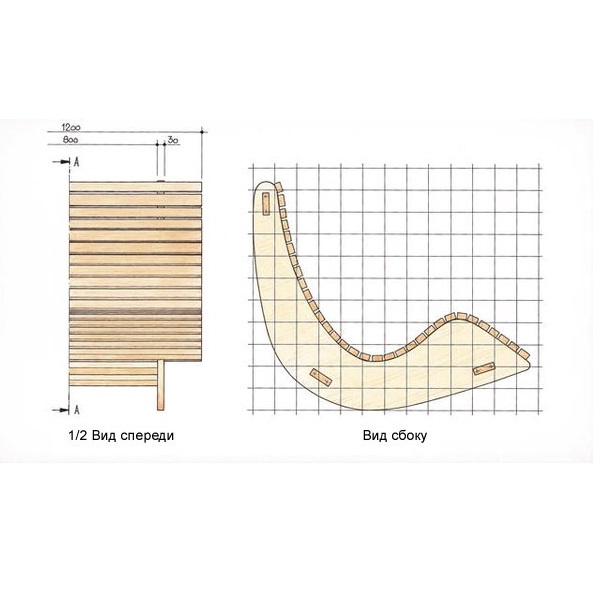
Stage # 2 - draw a drawing
Any responsible work begins with the manufacture of a drawing. It is necessary in order to correctly calculate the need for materials. However, the drawing is already there. On the metric grid, the pitch of which is 100 mm, there is a template for the side of the chair. It is best to transfer the drawing to paper and cut out a pattern, with which it will be easier to draw a contour on plywood.

Drawing of a great rocking chair that you can make your own skillful hands, made on a metric grid, the pitch of which is 100 mm
Small inaccuracies are acceptable, it is important not to make a mistake in the main thing: the sidewalls must be identical, on the rolling, their lower side there should not be any protruding corners.
Stage # 3 - cutting blanks from plywood and timber
For the manufacture of tie-bars and sidewalls, europlywood is required, the thickness of which is 30 mm. The sidewalls, as already mentioned, are cut with a jigsaw strictly according to the pattern. The dimensions of each of the three sides are 800x120 mm.
Now it is necessary to cut the blanks of the bars, which will later form the surface of the seat and back of the rocking chair. To do this, you need a beam measuring 50x25 mm, from which we will cut 35 blanks of 1200 mm each. Before purchasing the material needed for this, find out what is the standard length of one such bar in your stores.

Based on the proposed drawing, you need to make a pattern, with which you should apply the contour of the sidewall of the chair to plywood
The total molding that you need, you can easily calculate yourself. Observe the multiplicity so that when cutting the workpieces there is not a large amount of residue. Let your rocking chair be a little narrower than it was originally planned. For example, with a standard length of 2.4 meters, the length of one workpiece will be 1195 mm (subtract the thickness of the cut and subsequent processing).
Fasteners are easy. Need:
- confirmations (Euroscrews) 12 pieces, size 5x120mm;
- self-tapping screws 140 pieces, size 4x45.
In fact, the initial part of the work is already over, but you still have to work hard to get the desired result. In the process of this work, you will need drying oil, wood varnish, putty, antiseptic, which also need to be bought in advance.
Stage #4 - pre-processing parts
We proceed to sanding all the details and removing small chamfers. If your grinder is powerful enough and you know how to handle it, this procedure will not take you much time. Taking into account the fact that the rocking chair will be located on the street, Special attention it is necessary to give the ends of all elements in order to protect them as much as possible from dampness, to which they will undoubtedly be exposed.

Pre-treatment of parts does not only consist of sanding and chamfering. All measures must be taken to protect the end parts of the elements from decay.
The ends of the parts must be soaked with hot drying oil, and the wood fibers on them should be slightly flattened with a hammer. So moisture will be less absorbed. For the ends, the processing-varnishing-processing procedure must be carried out twice before general assembly designs.
Stage # 5 - assembly of the structure
No specific standards in the manufacture of this item garden furniture not provided. The holes for the sides are marked as logic requires: the headboard, the middle part of the outer arc of the sidewall and the footboard. The tsargs will be drawn to the sidewalls with the help of confirmations. To do this, a preliminary marking is made on the sidewalls, after which the two sidewalls are combined, and a through hole is drilled in their planes with an 8 mm drill. A 5 mm drill is used for the hole in the end of the tsarg. Now you can tighten the frame of the chair with euro screws.

Holes for drawers must first be marked, after which both sidewalls are folded together and neat through holes are drilled
Now let's talk about how to drill the bars that form the seat and back of the chair. We have exactly 35 of them. It is necessary to drill 4 holes in each bar (two on each side). And these are 140 symmetrical holes.
To simplify the task, we use a “conductor” - a device for marking a large number of homogeneous parts. We make it very simply: we take a piece of the same timber, no shorter than 250 mm, we drill holes in it for the template, the diameter of which should be the same as that of a marking pencil. From the end and one of the side parts of the "conductor" we nail plywood scraps, which will serve as a limiter that does not allow you to miss during the marking process. "Conductor" is ready.

Assembly is the longest and most time-consuming part of creating a rocking chair. However, the "jig" will help you facilitate the procedure for drilling symmetrical holes.

This is what the chair looks like at the final stage of work. Of course, in this form it can not be exploited yet. Measures must be taken to protect it from the weather
The "conductor" will be used to mark holes, it is impossible to drill through it, because you can break the template holes with a drill and the parts will have to be countersinked separately. If you take a 3.5x30 drill with a countersink, it will be possible to make a hole according to the finished marking as needed.
According to the drawing, there should be a gap of 15 mm between the bars. In order to avoid distortions, it is necessary to mark on the side of the chair the distance that will correspond to six bars together with intermediate intervals, and check the matching of the template inserts in thickness. If they match, you can continue to mount. Otherwise, an adjustment should be made. A four-millimeter wood screw holds perfectly in euro plywood. But given that the fastening frequency is high, it is better to use a 3mm drill bit.
Stage # 6 - finishing the finished product
Holes above the screws must be carefully puttied. The next in line will be antiseptic treatment and a three-time coating of the product with waterproof varnish. You have to work very hard. Remember how much your work has already been invested in this chair. After all, you want it to last as long as possible? Then try!

If you have small children, you can involve them in filling the holes over the screws, but you will have to carefully inspect the model for damage to fix them yourself
Sliding chair without skids
You probably noticed that all the models presented above have general principle work. The trick is that these rocking chairs use curved skids as the base. How to make a rocking chair without skids? It turns out that this is also possible. Watch this video and you'll get an idea of exactly how it's done.
Many of us are familiar with such an interior item as a rocking chair, which can be found in many country houses. For most, it is one of the favorite vacation spots, but not everyone knows that everyone can make such a chair. However, first you need to acquire certain knowledge, skills and prepare a tool.
IN last years rocking chair has become a fairly common piece of furniture. In the range of many furniture companies you can find a large number of models of rocking chairs designed for use in apartments and offices. Moreover, there are among them models made in classic version weaving method, and modern products that fully meet the requirements of high-tech style.
Benefits of a wooden chair
Before you start manufacturing, you need to decide what material to use for it as a basis. Although there are many options, the wooden chair is the most common. Therefore, further list the advantages that this material has:
- environmental Safety. Wooden furniture has been very popular among consumers for many years, which provided it with such qualities as natural origin, safety and hypoallergenicity. Therefore, the owners wooden chairs do not face any inconvenience in the process of using it, because they are confident in the environmental friendliness of this material;
- strength and long service life. Wood is enough durable material, which was transferred to the furniture made from it. In addition, it perfectly tolerates mechanical stress and demonstrates a long service life;
- attractive appearance and variety of forms.
Rattan rocking chair
We repeat that rocking chairs today offered in in large numbers most various options. One of these products is a rattan rocking chair, which not only has a pleasant design, but is also able to harmonize perfectly with other elements of the cottage interior. The birthplace of rattan is South America, and this plant itself is often referred to as a flexible liana.
Of the features of this material, it should be noted high strength, in which it is capable compete with wicker.
The technology of manufacturing armchairs from this culture is characterized by the fact that instead of traditional joints based on screws and bolts, glue and skillful knitting are used. Alas, it is impossible to buy this tree in our country, so most owners country cottages it is impossible to make such a chair with your own hands.
Wicker rocking chair
A photo of the options available today for this piece of furniture allows us to judge that a wicker rocking chair is quite in demand today. It can be found in cottages and even in apartments in many regions of our country. A willow vine is used as a material for it, and the finished chair itself fits well into the interior of a garden house, a summer residence, and even the greenery of a garden. consumer rocking chair willow vine attracts primarily because of its low weight and high strength. However similar furniture has one major drawback: excess moisture negatively affects the material, so in wet weather it is not recommended to keep such chairs on the street.
Materials for manufacturing
Regardless of what type of wood you decide to use to make a wicker chair, you must have certain skills. The tree is affordable and easy to process, so many owners who are thinking about making a rocking chair with their own hands most often consider using wood as the basis for it. But first it is necessary prepare certain tools for making furniture:
- electric jigsaw with a set of knife blades;
- disc grinder with a set of coarse and fine-grained nozzles;
- screwdriver with drills;
- tape measure and corner with a ruler;
- hammer and spatula;
- brush and pencil.
Execution of the drawing
Even before you start work, you should consider that for the manufacture quality rocking chair do-it-yourself drawing is required.
Having a sketch in hand, you can avoid serious errors in terms of product dimensions and correctly determine the quantity of materials that you will need to make.
First you need to take metal mesh, each cell of which corresponds to 1 cm, and outline on it a template for the side of the chair. To further make it more convenient to work, it is recommended to transfer the created chair template to plain paper. So it will be easier for you to mark the outline of the chair already on the plywood itself. Do not worry if small errors are made. Here it is important to maintain the symmetry of the sidewalls and avoid protruding corner elements on the outer rolling part.
 To do this work, we need plywood 3 cm thick, from which three drawers are cut dimensions 120 x 800 mm. The manufacture of sidewalls is carried out using an electric jigsaw exactly according to the pattern. After that, you need to take a beam 50 mm wide and 25 mm thick and cut out 35 fragments from it, each of which should be 120 cm long. The finished bars will later serve as a seat and back for us.
Try to get as much timber at the very beginning to minimize waste. This will be quite easy to do, given that you can calculate before buying overall length timber. Let's say if it will have a length of 2.3 m, then better chair make narrower. As a result, its width will decrease to 115 cm, however, this will allow you to avoid waste. The given dimensions of the rocking chair do not require their exact observance. Therefore, if in the course of work it becomes clear to you that it would be better to increase or decrease the size to minimize waste, you can do it without fear.
Workpiece processing
Surface treatment of workpieces is carried out using grinder. During the operation, it is necessary to pay special attention to their ends. If, during work, wood fibers protrude on them, then you need to use a hammer and level them, and then process them with hot drying oil. So you will make the ends of your furniture more resistant to moisture, which will positively affect its service life. When the drying oil dries, it is necessary to re-process to consolidate the result.
 The assembly of the chair is carried out, focusing on the drawing of the rocking chair. Need to fasten the two sides, used kings. But first you need to mark the places where they will connect.
According to common schemes for the manufacture of rocking chairs, it is recommended to fix them in the head area, in the middle and at the legs. When you have to fasten the tie bars to the sidewall, use a confirmation for this. This name is given to a special screw screed, with which they are fixed wood materials. First, before fastening, it is necessary to create holes in the sidewall 8 mm and in the end of the drawer side 5 mm.
Next, we begin work on creating the seat and attaching it to the base. We take earlier cooked 35 pieces of timber, in which you need to make four holes for two on each side. After that, the bars must be fixed to the sidewalls. Given the number of holes present, it is recommended to fix the bars with 3 or 4 mm self-tapping screws. During the fastening of the boards, constantly check the horizontal position of their installation.
Finished product processing
If we turn to the experience of making rocking chairs made of wood and plywood by ordinary owners with their own hands, we can identify a number of serious mistakes made after assembly. Among them, I would especially like to dwell on low-quality finishing or its absence. In order to do everything right and ensure the chair has the longest possible service life, it is necessary do the following:
- process the hole above the screws with putty;
- cover with a layer of antiseptic;
- apply waterproof varnish in two or three layers.
If you perform all the above work exactly, you can be sure that a rocking chair made by yourself will be able to please you for more than one year.
If you are going to start making a rocking chair with your own hands for the first time, then it will be useful for you read the recommendations experienced craftsmen who have done this work more than once:

Other types
One of the varieties of this piece of furniture is wooden Baby chair . It is done according to the same scheme as described above, however, you need to adjust the size for the age of the child. This also applies to the tilt of the backrest and handles. Quite often, child seats are made in the form of a horse.
Of particular interest is the rocking chair for the office. The peculiarity of its manufacture lies in the fact that leather is used for facing, as a result of which the product acquires a respectable and solid appearance. With such a chair at hand, a person will have the opportunity to relax and unwind during the working day.
Conclusion
 Although furniture manufacturing offers enough big choice furniture, one of the most desirable for many owners of summer cottages is a rocking chair. Settled in it you can relax and allow yourself to forget about everyday affairs for a while.
Moreover, in order to personal experience to feel all the benefits of having such a piece of furniture, it is not necessary to spend big money on buying a rocking chair. You can always make it yourself. Given that you can use available materials and tools, any person who at least once held a hammer and saw in his hands can cope with this task. There are many ready-made schemes for the manufacture of such furniture, therefore, if you strictly follow the technology of manufacturing a rocking chair, you can create a fairly elegant and reliable product that can serve you for many years.
Furniture made with your own hands is not only pleasing to the eye, but gives quite tangible pleasure. This is especially true, on which it is so pleasant to relax after a hard labor day or spend an evening at country house by the fireplace. In addition, by making furniture with your own hands, you save on purchases and give the product a unique originality. And our article will help you navigate the whole variety of models made from a variety of materials, and will give practical advice for working with them.
It is always necessary to start making a rocking chair with the choice of model and material. After all, furniture should be reliable, durable and delight your household for a long time. Let's talk more about the most popular products.
From plywood
Plywood is one of the most common materials used in the manufacture of furniture. It is easy to bend, easy to saw and simple to process. Designers often work with plywood, so finding sketches of furniture models on the Internet is not at all a problem. By the way, the strength of the rocking chair will be at the level, because plywood is twice as strong as wood, and its cost is low.
Before you start doing something from the prepared material, we advise you to process it protective equipment. This measure allows you to use the rocking chair not only in the house, but also take it outside if you decide to send the product to the country.
So let's get started. Let's go to hardware store and buy:
- three sheets of plywood measuring 1520x800 millimeters. All sheets of different thickness: four, ten and fifteen mm;
- a set of screws or self-tapping screws;
- wood glue;
- jigsaw.
Steps for making a rocking chair with your own hands:
- after acquiring the necessary materials, we take a drawing and make a blank of patterns. To do this, we transfer the drawing to thick cardboard and cut out the outlines of the details of the chair;
- with a pencil we make markings on a sheet of plywood using our patterns;
- We cut parts out of plywood with an electric jigsaw. From the thickest sheet, cut out two side elements, two racks, two seat supports and two planks measuring 470x45 mm. We will also have to make a 540x45 mm cross member and a 485x45 mm bar. A ten-millimeter sheet will go to cut eighteen planks 540x30 mm for the back and sixteen crossbars 500x30 mm for the seat. From the very thin sheet cut out square bases for the back and seat;
- be sure to clean all the details with sandpaper;
- glue the cut out cross members on the thin bases of the seat and back;
- we cover all the details with stain and varnish, if desired, you can special paint- it's up to your taste. Let the parts dry completely;
- we collect all the resulting parts together, not forgetting to pre-drill holes for screws or self-tapping screws. We hide their hats under special plugs;
- when making a footrest, use an old rake or shovel handle. The length of the stand should be five hundred and thirty millimeters.
Read on to learn how to make a rocking chair out of metal with your own hands.
The video below shows another interesting and fairly simple way to make a rocking chair with your own hands from plywood sheets:
metal
Metal structures, although more difficult to manufacture, are much stronger, and a rocking chair made of it is more durable. But at home, many of us will not be able to cope with metal work, because not everyone knows how to use welding, with which parts are connected.
To start on construction market or shop purchased necessary materials and tools:
- steel bars with cuts 20x20 mm;
- two-millimeter steel sheet;
- corners made of steel 40x40x3 mm;
- welding machine;
- drill;
- grinder or hacksaw;
- set of metal screws.
Manufacturing instructions:
- making a drawing. It looks like an ordinary chair, but a wide arc is described around the lower extremities of the legs. Note that all sizes are taken from the same chair. As for the arc, the wider it is, the safer the rocking chair;
- we cut the steel bars into segments one meter long and weld them to the main frame. frame step is five or six millimeters. It is necessary to bend the steel along the oval and weld it to the base;
- a two-millimeter steel sheet purchased by us is screwed to the part for the seat with metal screws. In principle, the rocking chair is ready.
After making the rocking chair, do not forget to clean all the welds with a grinder or a file. Also ready product should be treated with an anti-corrosion agent or painted.
It is worth noting that sitting on the metal is not very comfortable. Therefore, pillows are often placed on the seat or trimmed over the metal with wooden planks.
DIY rocking chair made of metal
from wood
- bottom bench. It consists of a covered proleg, a bearing cross, a sub-beam and a frame for seat support;
- seat;
- back;
- armrests.
Process description:
- we prepare about twenty-five long wicker three centimeters in diameter and many thin, five millimeters thick;
- with the help of a clamp ( special tool) bend thick;
- with thin rods we fix the legs of the frame on the cross and the seat frame;
- we tighten the prolegs;
- set arrows;
- we mount upper part backs and transverse bars of the seat;
- we weave armrests from rods and fasten them to shooters with the help of carnations;
- we attach the upper ends of the rods of the armrests to the side shooters;
- having prepared the typesetting rods, we put them on the back of the seat;
- we decorate all the elements of the chair with decorative weaving from a thin threaded ribbon.
Photo of a rocking chair made of vines, made by hand

Drawings, videos and photos
Our review presents all the most popular models rocking chairs with sizes that you can make yourself. For greater clarity, we have provided all descriptions with drawings, photographs and video reviews. We really hope that the materials selected especially for you will help you design the rocking chair of your dreams. And you and your family members will enjoy using it.
DIY rocking chair drawings
 boomerang type
  beech
beech  From plywood
 ornate
PVC pipes can be used to make many useful products including rocking chairs. You will ask yourself: is it worth it to waste your energy and make your own chair out of plastic? To do this, it is worth highlighting the advantages of a homemade chair from the profile:
- assembly takes little time and effort - this work is within the power of a woman or teenager;
- products from a professional pipe are considered the lightest, so they are easy to move;
- due to the high rigidity of the pipe, they are able to withstand heavy loads;
- homemade rocking chairs are resistant to weather changes;
- such products give scope for imagination, as you can personally come up with a shape for it;
- cheapness - the cost of such a piece of furniture will be quite low.
Make a rocking chair with your own hands from profile pipe not difficult at all. The most important thing is to prepare in advance necessary set tools.
Please note that the assembly process will take up to an hour, and this is with design in mind.
In order not to waste precious time, study in advance the photos of plastic products, in particular, do-it-yourself rocking chairs. This is necessary in order to correctly draw up a drawing of the chair. Do not forget that all the necessary drawings can be taken on the site.
Before we get started, let's define a list necessary tools. These include:
- roulette;
- marker;
- hacksaw for metal.
In the process, you may need other items, which include a file for grinding cuts, a drill and a soldering iron. You can make a rocking chair without the help of a level, because all parts will be fastened with fittings during assembly. These fastening elements do not allow deviating from the desired level, even with all the desire. For this reason, during the assembly process, you can refuse screws or glue, as additional fasteners.
Product design
Do not forget to make a drawing that indicates the dimensions of the future product. This is necessary before you start cutting blanks. The template can be viewed on the site to facilitate your work.
If you took up this difficult work on your own, stock up on graph paper, and also try to work accurately. Use an electric jigsaw for cutting. The closer you place the elements one to the other, the less waste you end up with.
Rocking chair option:
View 1 View 2 View 3 View 4
View 5 View 6 View 7
In the process of drawing, do not forget about the holes for fasteners. We carefully grind the cutouts with a special device. On a thick piece of cardboard we draw a neat grid in the likeness of graph paper. According to the finished sketch, we draw the necessary details, which we cut out as a result. Thus, we get patterns for a profiled base. We use them to transfer images to plywood in the process of making a chair from polypropylene pipes with your own hands.
Making the side parts and fixing the slats
The woven sidewall is reminiscent of appearance boomerang. In order to do it, there is the following scheme. On plywood sheet a pattern is applied, which is carefully outlined along the contours. The template is sawn electric jigsaw, and the edges are processed by a machine. Do not forget that we need two sides, so we repeat all the operations again.
Please note that if the rocking chair is made by hand from a profile pipe in the shape of a sofa, then three sides will be required.
On such an element, the headset can comfortably accommodate two people. Moreover, the central part will be twice as wide as the sides.
Planks for the manufacture of chairs are fixed on the bars. Installation of parts is carried out using self-tapping screws or screws. Thus, we get a framework. We cover it with an antiseptic, dry it and varnish it. We mask the caps of the fasteners with plugs that match the color of the product.
Assembly process

General view of the chair
Let's start assembling the chair from PVC pipes. Let's divide the process into several stages. To begin with, we will select the necessary pipes - we pay special attention to the parameters of the material.

Side element diagram

Exploded Side Element Diagram
If the elements are larger than necessary, cut off the excess.

We assemble the structure using fittings and a soldering machine.

Mounting the arc to the side
For more comfort, you can easy chair. To do this, take a piece of plywood, put a piece of foam rubber on it. We cover the resulting design with a cloth. Note that the soft seat should have larger parameters than the plywood part. This is necessary so that the edges can be stapled together. On the frame, the seat is fastened with self-tapping screws.
 The armchair is made of water polypropylene pipes
  The armchair is welded with a machine designed for welding polypropylene pipes
  Arcs and side bearings - from a pipe with a diameter of 25 mm, and transverse - with a diameter of 20 mm
  Reinforcement with a diameter of 14 - 16 mm is laid inside the arc, for rigidity
If the chair is plastic pipes still hard and uncomfortable, it is recommended to make a soft pad for the back. Alternatively, you can sew off a kind of foam mattress, and use leatherette for upholstery.
The finished product can be absolutely any kind. If the diameter of the pipes allows, then they can be bent using a soldering iron. When you attach the pipes to the legs of the chair, you will get a rocking element. If the seat is extended, the chair transforms into a waterproof plastic deck chair that does not need drying.


